miércoles, 3 de abril de 2024

ACTIVITY/TAREA 1: ONE POINT LINEAR PERSPECTIVE


ACTIVITY: "ONE POINT LINEAR 

PERSPECTIVE"


Following the information and vídeos you have here, 

do your own drawing.

Do not forget to be as original and creative as you can. 

HISTORY OF LINEAR PERSPECTIVE


As you already know we live in a three-dimensional world:  


1. Height, 2. Length 3.Depth
We can change or viewpoint, trasnforming the way we see things. That way objects seem to be smaller of bigger depending whether we are close or far away from them. The same way objects might seem to vanish or disappear when we move around them or we move away from them. Light also plays a very interesting role in the way we perceive objects. 


3D OPTICAL ILLUSION


These are examples for our NEXT ACTIVITY (one point linear perspective): 

Resultado de imagen de one point perspective 


3D STREET ART: A QUESTION OF PERSPECTIVE

The wife of 15th-century Italian artist Paolo Uccello used to beg him to come to bed. She was fed up of him staying up all night drawing objects with the new method of 3D illusion – or as it was called at the time, "perspective". He still wouldn't come to bed. "This perspective is such a sweet thing," he said.


martes, 2 de abril de 2024

PERSPECTIVE IN FILMS

WHO DO YOU CHOOSE TO BE?

This video, done by the film director: Juan Manuel Cotelo, was done in CoronaVirus times, but it can certainly be apply to our daily life. Food for though. Are you acting villain or hero? 


Here is a presentation with images from films that use one point linear perspectives, like Star Wars or Harry Potter. 


PERSPECTIVE IN FILMS

Resultado de imagen de perspectiva en el cine


lunes, 1 de abril de 2024

UNIT 5: REPRESENTATION SYSTEMS

We will touch this term the different ways to represent an object in technical drawing.One of them is the DIEDRIC SYSTEM. Lets get started with something easy, summarizing your knowledge from 1st ESO.Then we will practice with a few worksheets.

DIEDRIC SYSTEM


KINDS OF PROJECTIONS: 

LINEAR, ORTHOGONAL AND OBLIQUE


LINEAR PERSPECTIVE


domingo, 7 de enero de 2024

ACTIVITY: TESSELLATIONS

A tessellation, is  a repeating pattern of polygons that covers a plane with no gaps or overlaps. 

What kind of tessellations can you make out of regular polygons? 

This is the video we saw in class:

WHAT IS TESSELLATION? 


And these are some other ideas for your project: 


Slideshare from Ksumatarted

Slideshare from Bevster01 Slideshare from reederj

How can we create a tessellation using Photoshop?


Slideshare from reederj

martes, 12 de diciembre de 2023

OVOTANGRAM

 The construction of the OVOTANGRAM 


The ovoid tangram, egg tangram or also known as ovotangram is a tangram with a funny shape and with more pieces that curiously allows to build figures that resemble some types of birds.


HERE you can see how the ovoid is represented and the game is constructed.

domingo, 12 de noviembre de 2023

OP ART

 This term we will be searching and analyzing how to create a few optical illusions. We will get started by doing our own original pieces of Op Art. Here is t more information about it, about Bridget Riley's works and a few activities. 


NEXT TASK: "OP ART" using parallel lines and tangent circles

MATERIALS: Set square rulers and a black feltpen


OTHER OPTIONS:

Resultado de imagen de creating the impression of depth, bridget riley

Imagen relacionada

Resultado de imagen de creating the impression of depth with parallel lines

Resultado de imagen de creating the impression of depth with parallel lines

viernes, 10 de noviembre de 2023

UNIT 1.1: PRINCIPLES OF PERCEPTION: GESTALT

 OPTICAL ILLUSION from Elvira Fernadez-Luna

An image in which we can perceive something that is not physically in the image, can be interpeted in different ways or represent impossible perspectives.


GESTALT PRINCIPLES OF PERCEPTION


Gestalt (which means shape in German) psychology attempts to understand psychological phenomena by viewing them as organised and structured wholes rather than the sum of their constituent parts. In the 30s and 40s Gestalt psychology was applied to visual perception, most notably by Max Wertheimer, Wolfgang Köhler, and Kurt Koffka who founded the so-called gestalt approaches to form perception. More specifically, they tried to explain human perception of groups of objects and how we perceive parts of objects and formwhole objects on the basis of these.


Let´s watch a video


GESTALT PRINCIPLES

  1. LAW OF PROXIMITY: Elements of an image that are closer to each other are perceived as a figure or a group.


2. LAW OF SIMILARITY: Elements of an image that are similar or the same are perceived as a unit.


3. LAW OF PRÄGNANZ (PAST EXPERIENCE): The tendency to interpret ambiguous images as simple and complete, versus complex and incomplete. Reality is organized to the simplest form possible.


4. LAW OF FIGURE AND BACKGROUND: In an image, figure and background cannot be perceived simultaneously.


5. LAW OF CLOSURE: our sight tends to complete unfinished shapes or figures whent the contours are arranged in a continuous, specific direction.


6. LAW OF CONTINUITY: Elements that are arranged in the same direction are perceived as a unit.


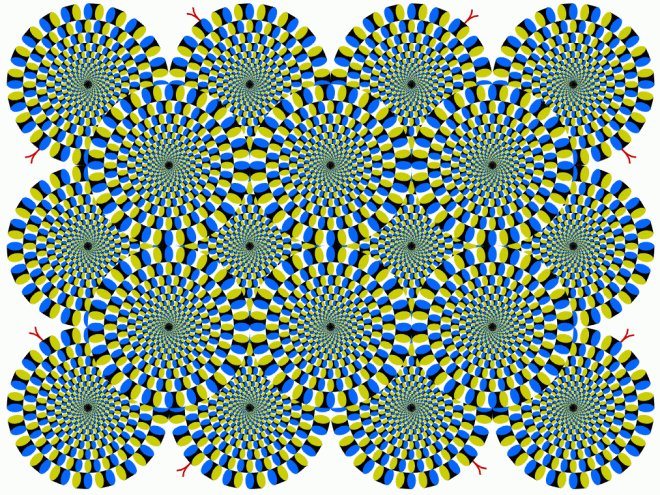
Let´s see some optical illusions:


https://verne.elpais.com/verne/2016/01/27/articulo/1453897011_477533.html


http://www.magicmgmt.com/gary/oi/index.html


https://lavozdelmuro.net/35-fantasticas-ilusiones-opticas-que-haran-que-replantees-seriamente-tu-cordura/


OP ART


TASK 1:Op Art Cube


Our project: Create a three dimensional cube using geometric Op Art Designs. You will use the elements and principles of design to manipulate lines and shapes to create optical illusions of movement on flat space. You will then build the three dimensional cube.


Materials: pencil, rubber, , black marker,cardboard A4, scissors and glue.


STEP 1:


STEP 2:

Draw a different Illusion inside each 3 x 3 square on your cube pattern. Draw with pencil light until you get it right.

STEP 3: Paint your illusions in black and white using marker.


Step 4: Cut out your finished cube . Do not cut off the tabs. Fold and crease each tab and each line as shown in class. Then glue or tape your cube together. You need to write your name on one of your designs in a corner small. You can also write your name on the inside of your cube in pencil.


Here you have some examples for your project.